Monday, 23 May 2011
11:38 PM
Another motorcycle post. I've now had to change the headlight on my Honda twice, so I'm getting the hang of it. Here are some notes should you ever find yourself having to do the same. :-)
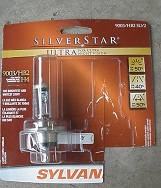
I have to note that the first (factory) headlight lasted pretty long. However, when I replaced it the first time, I replaced it with a particularly high-temp one (Sylvania Silverstar Ultra 4100K) that the guy at the parts store warned me wouldn't last nearly as long. (And is pricey.) However, I wanted absolutely as much light as I could get. In both cases, it was the high beam that expired, which makes sense, since I basically ride around on the high beam full time.
I got the gist of the following steps from the WikiAnswers site (of all places). The steps there are accurate (yay, and thanks to the anonymous poster), but extremely sparse. In the following I show you some pictures and add a trick or two that worked for me.
Tools and supplies- 10 mm wrench. Socket wrench helpful, open-end also useful for holding the nuts.
- 8 mm open-end wrench.
- 9003/HB2/H4 bulb.
 (Click to see larger version) (Click to see larger version)
Note: Do not touch the glass part of the blub. This will put oil from your fingers on it that will considerably reduce its lifetime.
1. Loosen and remove the 10mm mounting bolts that hold the headlight to the frame. Technically this step isn't necessary. However, I found it almost impossible to do the next step without this.
This can be tricky. From the POV of sitting on the bike normally, the mounting bolts have nuts on the left side. I found it easiest to loosen the top nut from behind using the 10mm open-end wrench.
Tip: As a minimum, remove the bottom bolt, which will let you at least swing the headlight up so you can access the bolts you need for the next step.
2. Remove the headlight assembly from the frame or swing it up.
3. Loosen and remove the 8mm bolts that hold the headlight retaining ring on. Do not touch the Philips screws that are close by -- those are for adjusting the headlight aim.
4. Pry the headlight cover off from the bottom. This might take a little bit of effort.
5. Remove the electrical connection to the bulb. This detaches the bulb assembly entirely.
6. Remove the dust cover. Note that the top of the cover says "Top".
7. Unhook the wire bracket that holds the bulb in place. You just have to lean on it a little so as to be able to unhook it. You can then swing the wire bracket back and out of the way.
8. Have a look at how the bulb fits in, then remove the old bulb.
9. Put the new bulb in. As I said before: do not touch the glass of the bulb.
10. Re-hook the bracket.
11. Put the dust cover back on.
12. Reattach the electric plug.
13. Swing the headlight back in, starting at the top. Take note of how the tapped holes on the headlight cover match up with the holes in the headlight unit.
14. Put the 8mm bolts back in.
15. Reattach the bolts that hold the headlight assembly to the frame.
16. Test the bulb.
17. Go get a spare for the next time. :-)
[categories]
motorcycles
|
link
|